Recently I decided to make these BROWN BUTTER BUTTERSCOTCH BARS.

They look soft and moist...because they ARE!!! My vision for these was for them to have a loaf cake-like base rather than a denser brownie type base because I felt that the soft texture would compliment the brown butter taste way better.


I also made a crumb topping very similar to the kind you might find on top of coffee cakes and spread that across the top of the bars right before they were completely baked. For the crumb topping, in a bowl I combined brown sugar, flour, and melted butter and mixed to achieve a slightly wet sand-like mixture which I sprinkled over my baked goods. Once they were out of the oven and cooled I drizzled with butterscotch. So good!
If you're not a fan of butterscotch you can omit it because believe it this is sweet without the butterscotch! oh and by the way, brown butter just refers to the brown color of the butter after you melt and heat it in a saucepan before adding it to your batter. It faintly smells like caramel!

Sometime last year I went to the mall and saw a CRUMB'S bakeshop right there and I got really happy. CRUMB'S was based in New York City and I had seen them compete on Cupcake Wars a while back and I was glad that a chain of their bakery was literally right in front of me! <3333 I knew I had to buy something from it. obviously it wasn't the full-sized version of the bakery in Manhattan but I was glad nonetheless. I bought the Cookiedough cupcake from them which I really liked a lot because it was so moist! Almost a year later I still remember that cupcake and decided to make my own. besides, you can't go wrong with cookies...AND CUPCAKES =) so here are my COOKIE DOUGH CUPCAKES.


In the two pictures above my flash was on. As the cupcake base I used my favorite cookie dough recipe but added an extra egg ( i usually only use one egg when I want to bake two dozen tablespoon sized cookie dough balls). I baked them in cupcake liners until they were golden brown on top.
DECORATIONS:
- I MADE COOKIE DOUGH BUTTERCREAM FROSTING (YEA, IT EXISTS) there isn't really an official recipe or anything soooooo i can make one for you guys if anyone is curious and wants to try it for themselves. it will be on my recipes page in the next few days =)
- I TOPPED THE FROSTING OFF WITH SOME MINI SEMI-SWEET CHOCOLATE CHIPS.
- I BROKE HOMEMADE COOKIES IN HALF AND STUCK THEM IN THE SIDES OF THE CUPCAKES =D


These two pictures above were taken in normal lighting.
So I know sometime over the summer I posted pictures of my homemade eclairs and profiteroles and now that family is back...with CREAM PUFFS.


Cream puffs are pretty much the same as profiteroles - they just have a cuter sounding name! When I made the profiteroles I just topped them off with chocolate ganache. I also had used a very basic custard-like cream filling. With these cream puffs I cut them in half (just as I did the profiteroles) and I put the same custard cream base but this time with added homemade whipped cream to create crème Chantilly, a much lighter and delicate version of the custard cream. I dusted with some powdered sugar and added a drizzle of milk chocolate - voila! 

Here's one more picture for you to check out! these are really great! I made them in conjunction with the chocolate chip cookie dough cupcakes above for a friend's potluck dinner party a few nights ago.

So I've shared with you a lot of cool twists on baked goods - red velvet cheesecake brownies, tiramisu sandwich cookies, and Ferrero Rocher zombie cookies to name a few but I've realized that I did not really post any classics so here is one for y'all that we all know and love: THE CHOCOLATE CHIP COOKIE.

These cookies are soft and chewy and light golden brown and taste great! Here I just used milk chocolate chips but you can use your favorite kind. This recipe is great for butterscotch morsels instead of chocolate ones - the possibilities are endless, however! Check out my cookie tower - yum!

These cookies are very similar to the Tiramisu sandwich cookies posted below but obvs. they ARE NOT. These guys are my DOUBLE CHOCOLATE SANDWICH COOKIES buuuuuut the concept is the same as that of the ones posted belowwwwwww.
.JPG)
.JPG)
The picture above is more of a close up for y'all. The filling that you see there is homemade chocolate cream cheese frosting (yes that exists!!!!!!!) It's as simple as adding melted chocolate AND grated chocolate to your favorite cream cheese frosting recipe. My recipe is as simple as a package of cream cheese and granulated sugar - I very rarely add vanilla extract because I LOOOOOOVE the taste of cream cheese on its own but some people don't. The more melted chocolate you add the darker in color the filling will be. I wanted a light brown color so I only melted about two tablespoons of chocolate and poured it in there.
.JPG)
Now on to the cookie part of this sandwich cookie...I used my favorite recipe for chocolate cake which includes cake flour, baking powder, unsweetened cocoa powder, granulated sugar, pinch of salt, and added mini chocolate chips for an extra somethin' =) those were my dry ingredients. I added about half a stick of margarine and a few tablespoons of water. since one of my friends is a vegetarian and cannot eat eggs I did not use eggs. if you want to use eggs in your recipe (I assure you it tastes great without lol) then use no more than one egg instead of the water. I wanted to be able to roll the dough easily so I did not want a runny batter. I baked them, sandwiched them, and then my friends and I enjoyed ~~~~~
.JPG)
I decided to make TIRAMISU in COOKIE FORM for this next goody. here we have TIRAMISU SANDWICH COOKIES - PERFECT FOR TEA PARTIES, GIFTS, AND FOR JUST PIGGING OUT.
.JPG)
I made some brown sugar sugar cookie dough, and rolled the dough into small balls. I took a generous amount of cocoa powder and rolled all of the balls into because Tiramisu usually has a dusting of cocoa powder on top =)
.JPG)
I baked the balls for about 10 minutes, during which they spread out slightly - perfect for creating sandwiches! I mixed together my usual cream cheese frosting buuuuuuut this time I added a touch of cocoa powder, some chopped chocolate chips and a tad bit of brewed coffee. I don't really drink coffee so if you're a coffee lover you can add as much as you'd like!
.JPG)
.JPG)
Then of course, all you do is sandwich together the yummy filling in between two of your chewy baked cookies! I know these cookies do not contain ALL of the elements found in the traditional tiramisu but the point of these cookies was to re-create some of the flavors in a smaller form. You'll enjoy this anyway!!! <33333
.JPG)
This was my first time making PEANUT BUTTER BLOSSOMS and I have to say, they turned out pretty great! They looked great and tasted great and this is coming from someone who IS NOT a fan of peanut butter >.< I don't really like the taste of it but the peanut butter blossoms were good enough for my taste as I made sure the peanut butter was not overwhelming.
.JPG)
.JPG)
Peanut butter blossoms are very simple cookies to make. It involves rolling cookie dough into a small ball and placing the balls on cookie sheets to bake where they spread out a little bit. Once they come out of the oven you usually firmly press a Hershey's kiss in the center.
.JPG)
You don't HAVE TO make PEANUT BUTTER blossoms - get creative! Make your own sugar cookie dough rather than peanut butter cookie dough and instead of using plain milk chocolate kisses for the center get creative and use peppermint kisses if it's the holidays or cookie n' cream kisses if you just want to mix it up a bit!
.JPG)
What if you wanted a brownie...but you also wanted s'mores???? You can't have both...OH WAIT you can....
I made these yummy s'mores brownies one day. I took graham crackers and crushed them up and added melted butter and a few tablespoons of sugar to them. I pressed them into my baking pan so this would be our crust/ graham cracker half.
.JPG)
Next I prepared a normal homemade brownie batter. I added some mini chocolate chips as needed...or don't. Bake the brownies DON'T add the marshmallows yet!!! I had an experience where I wanted to make marshmallow brownies and I stupidly added the marshmallows over the raw brownie mixture and but the two in the oven to bake. The marshmallows liquefied on top and hardened...not fun =(
.JPG)
.JPG)
Once the brownies are done baking liberally sprinkle the top with marshmallows of your choice. Put it into the oven but instead of baking you're going to broil the marshmallows. Broiling is a way of easily charring the surface of your food. You want to keep an eye on your brownies because while you want the marshmallows lightly charred for that smokey taste you don't want them...burnt.
FYI the marshmallows look more burnt in this picture than they really were lol x.x
.JPG)

For this class I take in college we had to do a community service project in groups so my group decided to bake homemade dog treats and go to an animal shelter and feed the dogs. The three of us baked peanut butter dog treats and used these cool bone shaped cookie cutters. They came out looking great!!!!!

So who doesn't like s'mores? classic camp fire treat. But when you're living in a college dorm room you'll have to hold off on the campfires...but not the s'mores!!!!!!!!!!!!!!!!!
.JPG)
.JPG)
I found it best to microwave the chocolate on one graham cracker side alone in the microwave until the chocolate began to soften. The marshmallows melted easily but the chocolate didn't.
See how gooey that chocolate is???????? <3 <3 <3 Mi piace <3 <3 <3
.JPG)
SOOOOOOOOOOO I made this pretty ANGEL FOOD CAKE a week or so ago and it came out looking AMAZING::::::::
.JPG)
.JPG)
There isn't much I can say about this cake other than I am proud of its aesthetics lol.
DECORATIONS:
- HOMEMADE WHIPPED CREAM THAT I USED AS FILLING AND TO ICE THE TOP. AS YOU CAN SEE I ALSO USED A WILTON 1M DECORATING TIP WITH A PIPING BAG FULL OF WHIPPED CREAM TO CREATE THE SWIRLS.
- STRAWBERRIES CUT IN HALF <3
This cake is sweet and very fluffy and light. it's like...a cloud...with whipped cream...which makes it even more cloud-like lol.
.JPG)
.JPG)
So it's fall now and it's the perfect season for warm, crisp, baked goods...LIKE APPLE PIE!!!!!!!!!!!!!!! I can't eat apples but I made this anyway.
.JPG)
.JPG)
The first picture was taken with flash and all the ones that look like it were also taken with flash. The picture directly above this paragraph was taken without flash. Making this pie was a simple process and I was very happy with the way it turned out.
.JPG)
.JPG)
First I needed to prepare the crust which is as simple as flour, salt, butter/margarine, and ice cold water mixed together in a bowl. You must refrigerate your crust dough for at least one and a half hours. I separated my dough into two balls before placing it in the refrigerator to chill. Once chilled roll out one ball into a large circle that is big enough to fit into the base of your pan and comes up the sides.
While my dough chilled I prepared the apple filling. I peeled two medium sized apples (you can add more if you're an avid apple enthusiast lol) I peeled them and soaked them in saltwater to prevent them from turning an ugly brown color >.< then I dried the apples, leaving a bit of moisture in them, and in a separate bowl I made a mixture of flour, A TON OF CINNAMON, nutmeg, brown sugar, and white sugar. I added the somewhat moist apples to that mixture and mixed. You can add about a teaspoon or more of water to the apple-dry ingredient mixture as needed because I wanted the dry ingredients to be pasty on the apples.
using the second ball of dough I rolled it out and used a pizza cutter to cut the dough into one inch thick to one and a half inch thick strips. I used these strips to create the criss-cross pattern on top.
This apple pie took an hour and change to bake because it takes a while for apples to cook.
Enjoy one more picture of my homemade apple pie: =)
.JPG)
These are pretty simple compared to a few other things I have done in the past but these are my FUDGE FROSTING CUPCAKES and they are literally just a yellow cake cupcake with fudge frosting and mini chocolate chips on top. that is all there is to it.


The flash was on for all of these pictures so you could see the cupcakes better.
DECORATIONS:
- THERE ARE HARDLY ANY BUT YOU CAN COUNT MINI CHOCOLATE CHIPS IF YOU'D LIKE.


I decided to experiment with this as I have never made croissants before but this came out looking AMAZING!!!!!!!! NO JOKE I AM SUPER SATISFIED WITH THE WAY MY NUTELLA CROISSANTS CAME OUT especially because, as I just said, this was my first time dabbling with croissant-making.
.JPG)
.JPG)
.JPG)
There's the little nutella filling. I didn't want to add too much because I didn't want anything exploding and have nutella running all over the baking sheet x.x I dusted them with some powdered sugar because I thought it'd look nice. <3 No joke these were fluffly and crispy and soooo goooood!! They baked so great and looked, in my opinion, perfect!
.JPG)
So today I made some nice CREPES with a nutella drizzle and some homemade whipped cream. Crepes are super duper easy to make and they can easily be made to look like a mega sophisticated dessert. I will have the recipe up soon so if anyone is interested in finding out how I make my crepes the recipe will be there.
.JPG)
I also lightly dusted the top with powdered sugar before putting on a dallop of whipped cream. Crepes can also be served for breakfast where you can opt for scrambled eggs and bacon rather than whipped cream and nutella but seeing as this is a dessert blog, it's obvious what I chose to do with my crepes...
.JPG)
.JPG)
This is not one big crepe in the picture there are actually three crepes folded over on top of each other x.x Enjoy!!!!
Sooooo I want to show you guys something...interersting.... we recently bought a taco kit that came with a bunch of taco shells, taco sauce, and taco seasoning and so we were making our own tacos at home. Anyways we had some shells left over and my brother decided to make a creation of his own............
.JPG)
And thus we have ICE CREAM TACOS 0.0 0.0 0.0 strange? intriguing? delicious??????? You decide.... Here we have a crunchy corn taco shell with vanilla ice cream and some rainbow sprinkles and HE REALLY ENJOYED IT!!!!!!!!!!!!!
.JPG)
HEY GUYS so here's another post for you all I made MOIST MARBLE LOAF CAKE and I'm not even kidding about the moist part - it REALLY is moist!!!!
.JPG)
.JPG)
This really was a delicious cake that wasn't too sweet, which is great for people who don't enjoy a lot of sweets.

.JPG)
This was a great loaf cake and I will be posting the recipe for this shortly!
So I made PROFITEROLES which are like the round version of eclairs!!!!!!!!!!!! =0 They are both French pastries and some may know profiteroles as cream puffs or choux a la creme.
.JPG)
.JPG)
The recipe for profiteroles is the same as that for eclairs - you just pipe the profiteroles into balls instead! This is yet another impressive but super simple dessert! Obviously, I made more than just two but I only wanted to showcase these two. Here's one more picture of my homemade profiteroles:
.JPG)
I'm sure many of you have tried eclairs in a fancy restaurant and enjoyed the creamy filling and rich chocolate on top of the pastry. Making eclairs at home is super easy and fun and I thought I'd share the results of my ECLAIR baking with you.


I made mini eclairs, the recipe for which you can find on my 'recipes' page. These really were super easy to make and super delicious to consume! =) There wasn't much decoration going on so I'll just talk about the chocolate ganache topping that I made. As you can see it is just so glossy looking and it tastes really rich. I used a blend of semi-sweet chocolate and dark chocolate for this chocolate ganache. The cream filling was just...CREAMY lol. As for the pastry...I CANNOT DESCRIBE ITS GOODNESS - try it out for yourself and see ;)


I will shortly post a how-to on this yummy cream filling. It is also great for filling profiteroles, Boston cream cupcakes, Boston cream PIE, and probably many more. If you prefer a lighter filling then you can choose to substitute the cream filling with whipped cream instead, the recipe for which is already on my "how-to" page.
These taste great but I'll admit...they DON'T look great 0.o I was going to call these my FRRERO ROCHER CHOCOLATE CHIP COOKIES but they look like they've been dug out of a grave........0.0 so they will also be known as my ZOMBIE COOKIES.
.JPG)
.JPG)
SEEEEE I TOLD YOU!!!!!! Don't be alarmed because cookies cannot physically eat your brains lol. They have a dark color to them because when I mixed in the Ferrero rocher pieces I MIXED them in so the hazelnut filling got spread throughout and made the dough darker.
As you can see they are not all zombie cookies because I baked some normal chocolate chip cookies too.

Without flash

With flash
THESE WERE REALLY GOOD!!!!!!!! SO chewy and I LOVE rocher and it just added an extra nutty texture and extra taste. If you love rocher this is a recipe you should definitely try out!!!

Here is a picture of the HUMAN chocolate chip cookies!!! =)
Ever had a cake that tastes like a truffle? Now you can with these MINI TRUFFLE CAKES! They are rich with a fudgy dark chocolate taste plus topped with an extra drizzle of milk chocolate.


These things seriously melted in your mouth!!!!!!! SUPER FUDGY AND RICH!!!!!


DECORATIONS:
- chocolate drizzle
- cherry on top
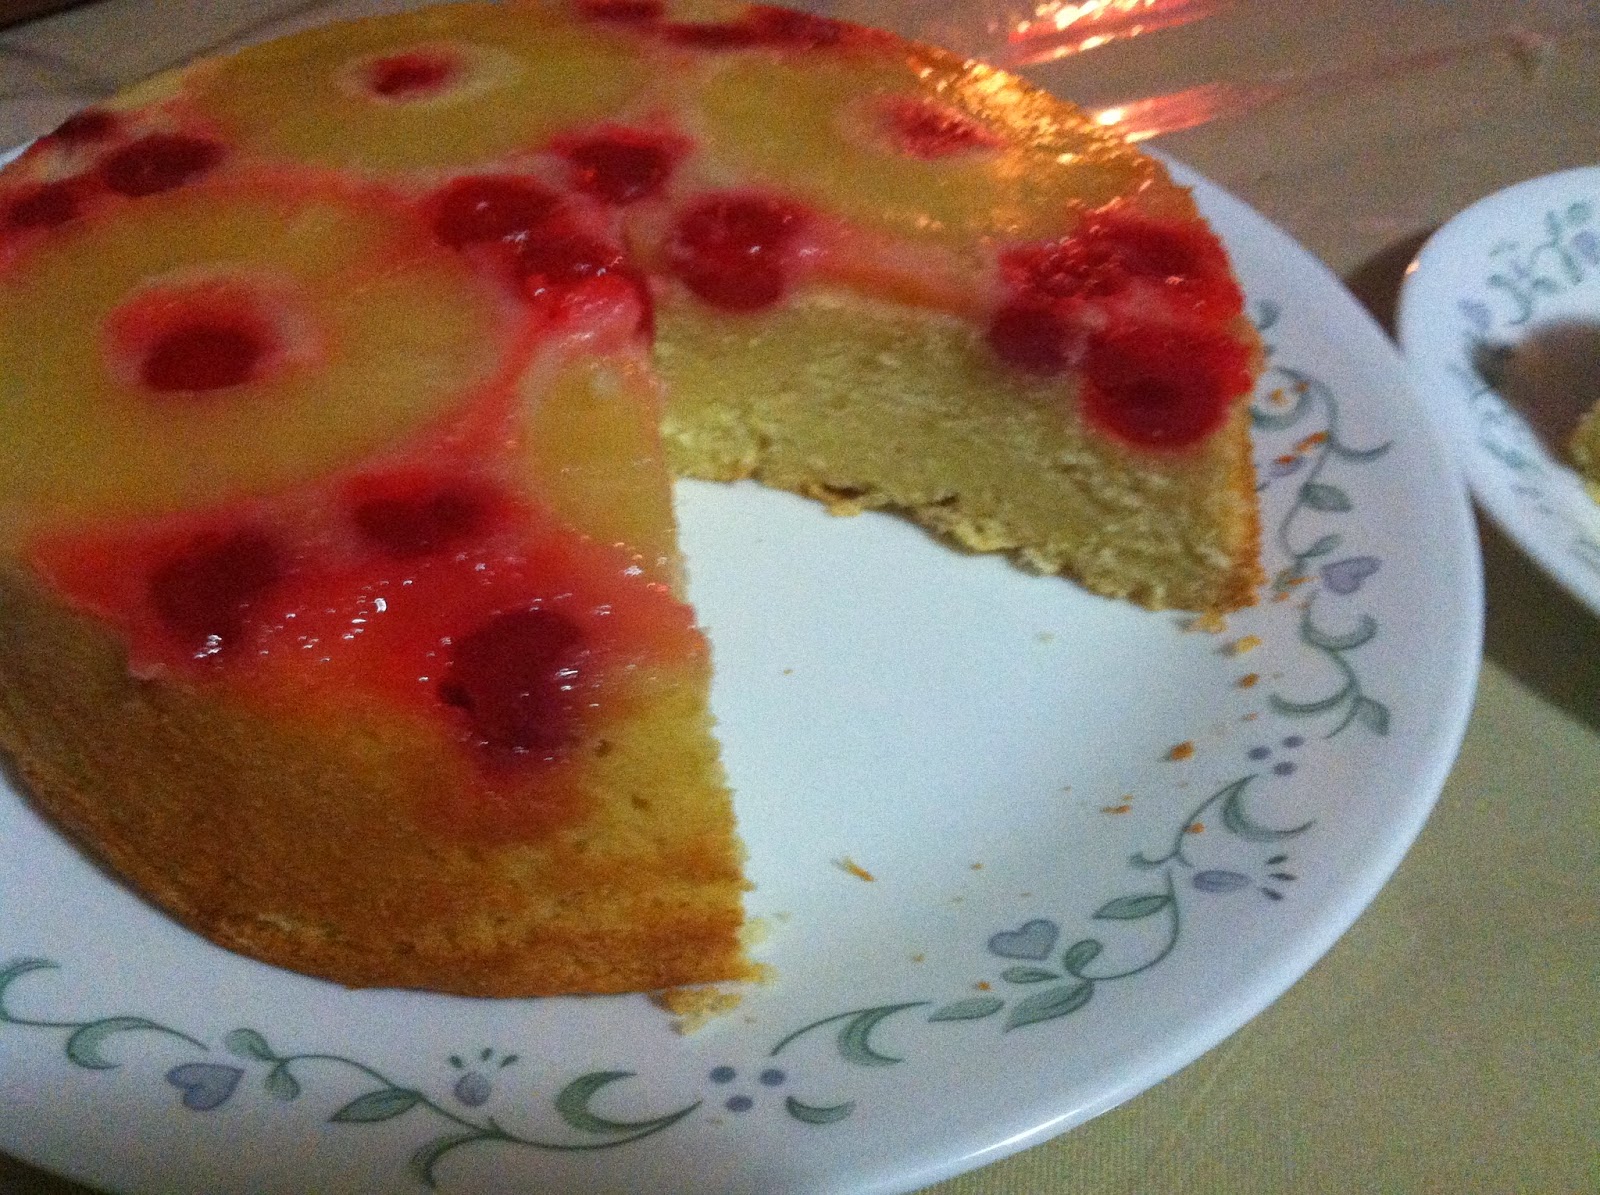
I don't know how many people are pineapple lovers but pineapple is one of my favorite fruits. I made a PINEAPPLE UPSIDE DOWN CAKE a few days ago and it was great! Very moist, not super sweet and it was definitely a hit.


Basically you put some melted butter in the bottom of a round baking pan and sprinkle it with brown sugar. I did not use brown sugar so instead I used regular granulated sugar which works just as well.

DECORATIONS:
- Arrange the pineapple slices and cherries in any fashion you want.

YUM! =)
So I had this on my baking bucket list AND it was also requested by someone at my school because she really liked it a lot the first time I made it. The first time I made my ICE CREAM FILLED CUPCAKES I took pictures of the exterior (as you can see if you scroll down like a lot) but did not take pictures of the insides to show you guys =( this time I did, however! =)


I hope you can see the ice cream inside x.x I used coffee flavored ice cream (perfect for coffee lovers lol) so the coffee flavored ice cream is that brown looking stuff in the center =) The cake itself is homemade yellow cake, the recipe for which you can find on my Recipes page. In this picture the ice cream was kind of melting x.x I made whipped cream, like the first time, for these cupcakes and topped off with a chocolate drizzle.

HA HA HA I put the cupcake in an ice cream cone lol...I know, I'm lame =) <333333333


As you can see the coffee flavored ice cream is from Haagen-Dazs.

HEY WOULD ANYONE LIKE A SCOOP OF ICE CREAM (...filled cupcakes)...? Yeah, that one was terrible but I tried, right? Lol =)
I made these KIT KAT CHOCOLATE CHIP COOKIE BARS two days ago and decided to post them right now. There are two parts to thee bars: brownie part and cookie dough part.

I used Baker's semi-sweet baking chocolate in the brownie part and in addition to that I mixed in some dark chocolate morsels (to make it extra rich). The cookie dough part included milk chocolate chips, as pictured above, and, of course, Kit Kat pieces.


In these pictures if you see square shaped chunks of chocolate then those are the kit kat pieces. I really like the way these came out - they were REALLY CHUNKY!!!!!!
DECORATIONS:
- Do kit kat pieces count?


SO THIS CUPCAKE IS ONE OF MY FAVORITES. When I made these I wasn't certain if people would like them because I didn't know if anyone liked carrot cake (this was sort of a last minute decision) so I coupled it with something almost everyone loves -CHOCOLATE!!!!!!! Thus, here are my DARK CHOCOLATE CARROT CAKE CUPCAKES.


DECORATIONS:
- After spreading on frosting, I emptied my whole bottle of orange sugar crystal sprinkles into a flat saucer and dipped each cupcake, frosting side down, into the sugar crystals.
- I tinted some of the leftover frosting green (using Wilton food coloring gel in LEAF) and dark orange (using Wilton food coloring gel in COPPER) and piped carrots on top of the sprinkles.

Oh, btw, I made cream cheese frosting for this because in my opinion carrot cake and cream cheese frosting are de-LISH together!!!!!!! <3 <3


In case you were wondering, my dark chocolate and carrot combo worked out AMAZINGLY. =) =)

I call these cupcakes my CLASS OF 2014 CUPCAKES because I baked them for a bake sale that my senior class had earlier in the year. They're nothing too special; as you can see, these cupcakes are one of my more simply decorated ones. It is devil's food cake with marshmallow buttercream on top (super gooey!!!!!!! for you marshmallow lovers <3 <3 <3333) but these cupcakes were a hit nonetheless.


DECORATIONS:
- All I did here was take a bag of blue candy melts (that I bought from Michael's), turn the candy melts so that the slightly rounded side is facing down, and pipe the number 14 (for class of 2014) on top. Nothing to it, really.
These cupcakes are my ICE CREAM FILLED CUPCAKES which I made for my 18th birthday. I must warn you, they look weird - the color from the candy coated chocolate pieces I used literally melted off because I made whipped cream to top the cupcakes and I had to move the cupcakes from the freezer to the fridge and the change in temperature caused the meltdown =( they were still pretty popular though =)


- Other than the homemade whipped cream topping (tinted using ROSE and LEAF) I took candy coated chocolate pieces and placed them on top.
- I used confetti icing gel to pipe a glittery number 18 (which you cannot see =/) on some of them.

Here I made OREO CHEESECAKE PIE - another dessert for Oreo lovers!!! I only call it a pie because I baked it in a round foil pan and usually pies are round soooooo. For the crust I finely crushed Oreo cookies in a Ziploc bag, added some melted butter, and packed it firmly into the foil pan.

DECORATIONS:
- After the cheesecake pie came out of the oven I generously sprinkled some leftover crushed Oreo cookies over the top.
- I took my homemade whipped cream, filled it into a piping bag and piped that fluffy looking border that you see. I used the Wilton 1M decorating tip to do this.
Here is a close-up with flash. This picture doesn't make it look appetizing in my opinion but take my word for it - it was delicious!

CHUNKY FUDGE WITH PEANUT BUTTER DRIZZLE......'nuff said.

DECORATIONS (EVEN THOUGH THERE ISN'T MUCH):
- Simple peanut butter drizzle
This dessert is no-bake and rather easy to create. It is VERY sweet so if you have a MASSIVE sweet tooth, this is the dessert for you.

Ahh birthdays - the anniversary of one's birth. For my 17th birthday I made these S'MORES CUPCAKES. The rich Hershey chocolate batter came out so moist after it was baked. I made a marshmallow fluff buttercream to pipe onto these guys (the how-to on that will be posted under the how-to section soon).


DECORATIONS:
- crushed graham cracker crumbs sprinkled somewhat lightly on top.
- I used a tiny star shaped cookie cutter to cut out shapes from my homemade modeling chocolate (check out the how-to section for instructions that will be posted soon).
- I don't know if you can tell by these pictures but on top of the star shaped pieces of chocolate I dusted on some edible glitter from Wilton in SILVER.
- Over the glitter I used some more marshmallow fluff buttercream to pipe the number 17 on top.

Now all we need is a campfire and we're good to go =)
How many of you like red velvet cake? How about cheesecake? I must admit I am a cheesecake loverrr <3 ANYWAY last but certainly not least how many of you like brownies? What if you could enjoy all three of these fabulous desserts in ONE SUPER FABULOUS dessert? 0.0 0.0 Ladies and gentlemen I give you....RED VELVET CHEESECAKE BROWNIES!!!!!!!!!!!


These brownies definitely tasted as good as they looked. Unfortunately, These pictures and the next two were the only pictures I got to take of these guys...they went fast!!!

I didn't really have any decorations for this but I will say that for the cheesecake part of this brownie, before I threw it into the oven I took my cheesecake mixture and with a spoon I put generous dollops of the mixture randomly on top of the red velvet brownies.
With a knife I used a marbling technique (super easy) to spread the cheesecake mixture around. That's it!
Here's one more pic for you to check out:

If you would like to make your own red velvet cheesecake brownies, get creative! You don't have to marble the cheesecake on top - instead you can actually have a cheesecake layer at the bottom of your brownie!!! I just chose to do it this way because I thought the marble look was really cool.
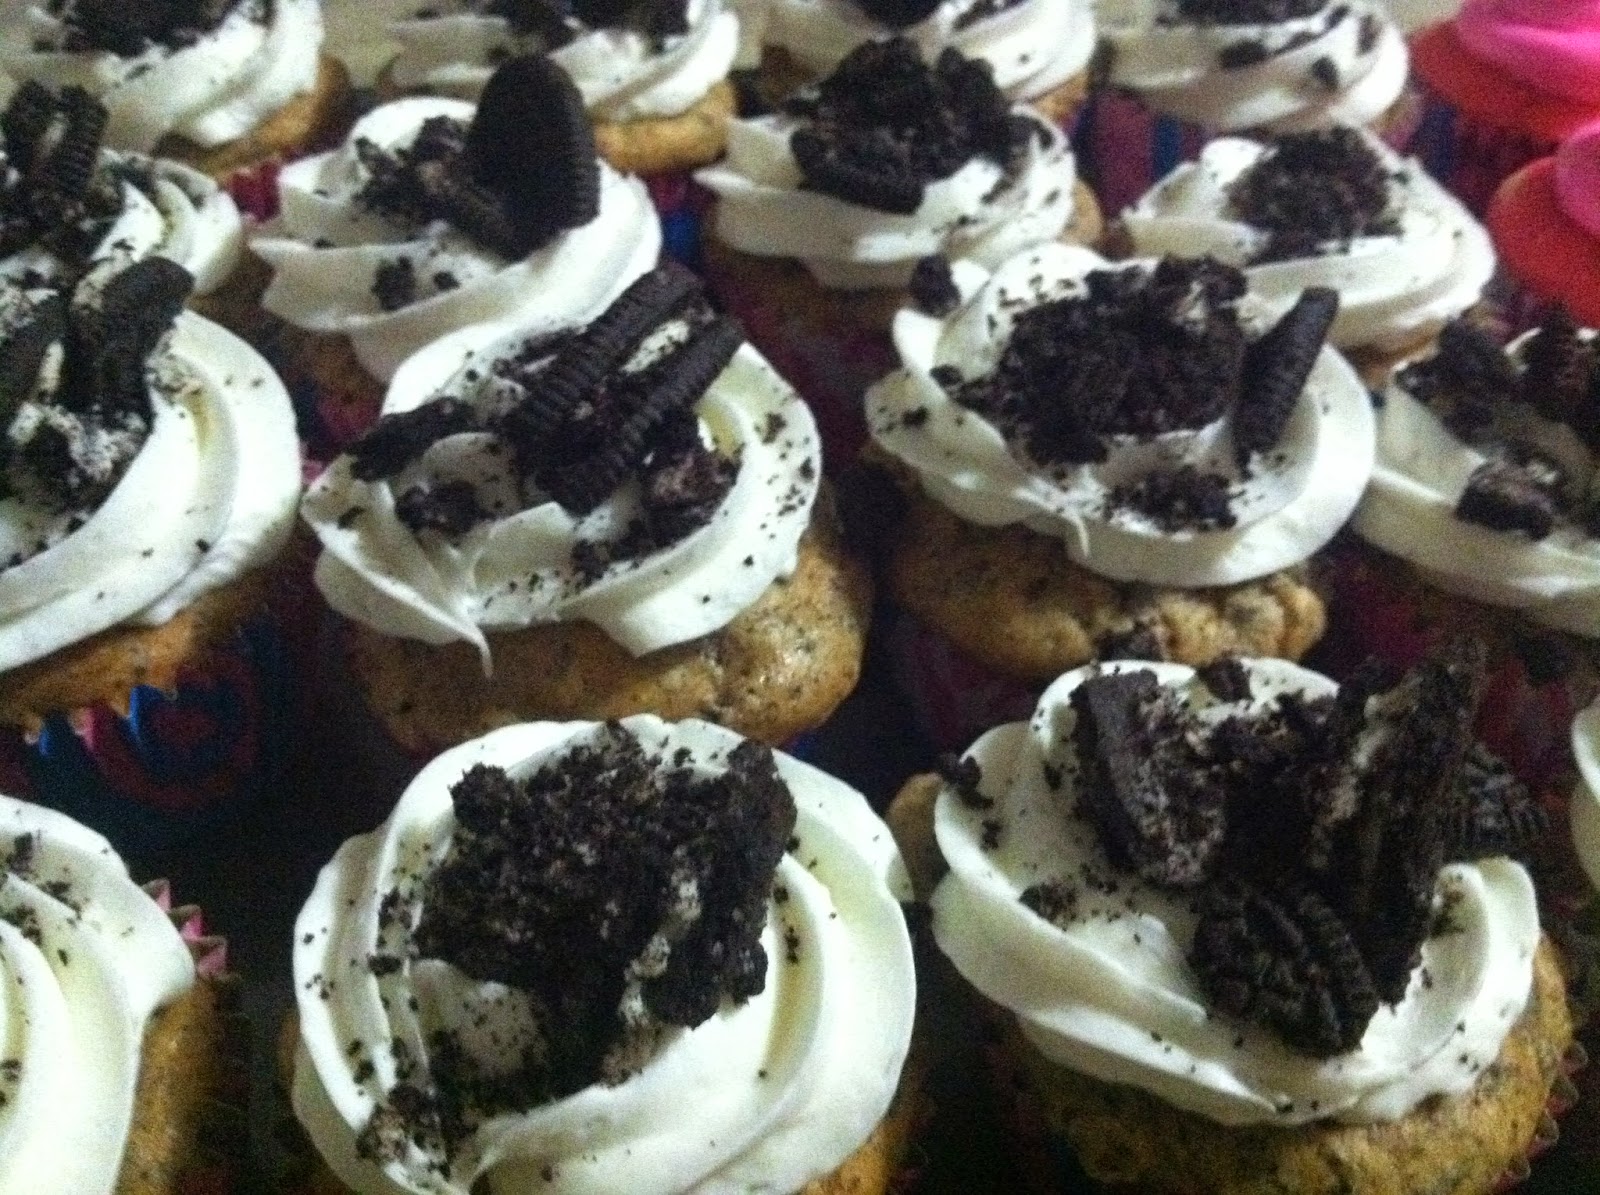
SOOOOOO these guys are my OREO CUPCAKES <3 <3 <3
How many of you are Oreo fans? You'll probably looooooove these cupcakes - I coarsely crushed Oreo cookies and added them to my vanilla cake batter. I threw in some nice big chunks for a piece of Oreo in every bite!

BUUUUUUUUUUT as you can see, the Oreo cupcakes are not alone.....right next to them are my SUPER PINK CUPCAKES (I didn't have another name for them x.x) they're....pink........like....all over......

DECORATIONS:
1. OREO CUPCAKES:
- other than the vanilla buttercream piped on top, I coarsely crushed some more Oreo pieces and sprinkled them generously on the tops of each cupcake
2. SUPER PINK CUPCAKES:
- I piped the same buttercream that I used for the Oreo cupcakes onto these cupcakes. I tinted it pink with Wilton food coloring gel in ROSE (I also did this to the cake batter)
- I sprinkled on some orange sugar crystal sprinkles


I actually made these cupcakes for my best friend's 16th birthday. They are just plain vanilla cupcakes but I am really proud of these because they came out looking GREAT in my opinion.


Here they are!!!!!!!!!!!!!!! I put them in these very decorative cupcake boxes that I bought from Michael's and they made presentation more breath-taking. (I am somewhat of a perfectionist and I wanted everything to look perfect!!!!)


DECORATIONS:
- Cream Cheese frosting tinted pink with Wilton food coloring gel in ROSE
- Orange sugar crystal sprinkles
- A little blue flower piped on top with one white confetti sprinkle as the bud
- Chocolate sea shell made by melting yellow candy melts and putting them in sea shell molds (I got the molds from Michael's)
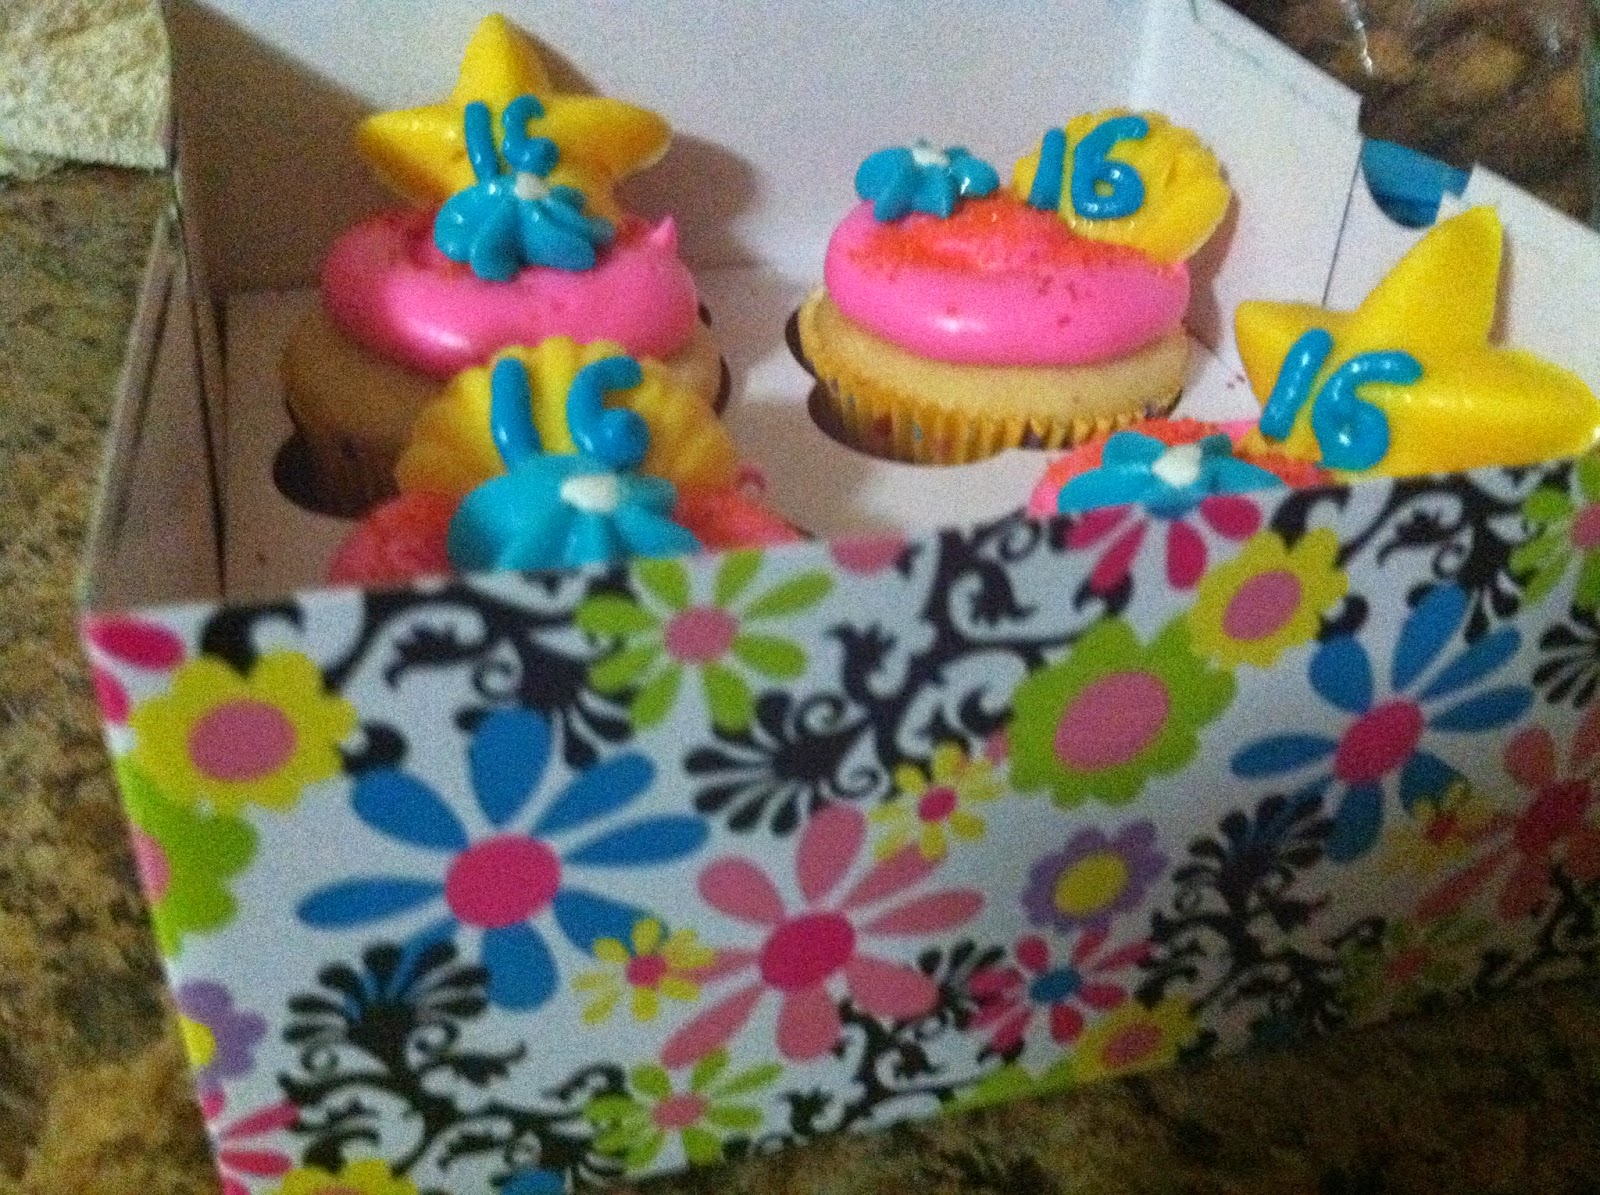
Here's a shot of the design of the box I used =) <3 <3 <3 <333333333

These are my KISS IN THE MIDDLE CUPCAKES. They are just vanilla cupcakes with buttercream frosting that I tinted light blue using a small amount of Wilton food coloring gel in BLUE. I put one HERSHEY kiss in the middle of each cupcake. As you can see, here I got a clean cut straight down the middle =)

I'm not completely certain why but in this picture and in the next one the color of the frosting is a different shade 0.o I think it is an effect of the lighting x.x
DECORATIONS:
- Homemade buttercream frosting tinted light blue with a VERY small amount of Wilton food coloring gel in BLUE (you'll probably notice that I use this color a lot because it is SUPER pigmented and I really like it )
- Chocolate sprinkles

Once again, the product of weird lighting.


This is the "mixed" part of things =) Some of them say '12 on them because I made them in 2012 at the end of the school year.
DECORATIONS:
1. SNICKERS CUPCAKES:
- Homemade caramel sauce
- SNICKERS candy bar cut into pieces
2. '12 CUPCAKES:
- Yellow and Orange fondant cut into circles
- chocolate drizzle
3. OTHER CUPCAKE :
- Vanilla buttercream tinted a weird shade of purple using Wilton's gel food coloring in BLUE and ROSE
- pink and white confetti sprinkles

BIRD'S-EYE VIEW =)
HEY GUYS HERE IS MY FIRST EVER POST!!!!!!!!!!! =)


DECORATIONS:
- Pink, Purple, and Yellow colored fondant rolled out and cut into tiny circles
- Blue sugar crytal sprinkles
- White Chocolate piped to spell out "Aloha" (those are the white letters sticking out of the tops of some of the cupcakes)

Here is just one more close-up for you to enjoy~~~~
No comments:
Post a Comment